Installation Instructions - Roofer
Take a look at a typical installation, in this short
film.
 Assembly film 4 (minutes) 6,7 MB
The roofer makes a "roof check" before beginning the
work.
Your Roofer will check
- That the roof area is large enough to accommodate
the planned installation. A 1kWp installation consists
of 96 solar roof tiles, arranged in sets of 8 (strings),
each string is 12 roof tiles.
- That the chosen area is free from shading and
shadows.
- There is adequate roof ventilation to prevent heat
or condensation build up.
- The tile manufacturer, type and colour to be
replaced, and the availability of the SRT model.
- The original roof tiles were properly installed and
can be easily removed.
- For obstacles such as vents, sky lights or
chimneys etc.
note: When obstacles are within the planned
installation area they can be easily accommodated with
the flexible "string" system
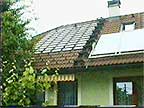
The installation area ideally should face direction
south (SW-SE) on a diagonal roof with a 25-35 degree
incline.
The "roof check" now complete, your
roofer will be able to make a detailed diagram of the
existing roof clearly indicating the position of the
planned installation. Below are a few helpful pointers
for the roofer to complete his diagram.
He must determine the best position for the solar
switch box (SSB) inside the roof. This should be as
central as possible to the installation area, in an
easily accessible area.
Depending on the string arrangement used the roofer
can then plan the cable channels to meet at a central
point where they will enter the roof, for connection to
the solar switch box (SSB).
It is also important to mark out where and in what
arrangement your strings will take, mark and number the
strings to their corresponding solar switch box
connection. This will aid any troubleshooting should a
connection problem arise.
The SRT (1kWp) set comes with 2m extension cables, in
the event your strings are more than the standard cable
distance from the central roof entry point.
Possible or existing special fittings like snow stoppers
can be easily integrated.
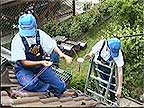
Assembly by the licensed roofer
The Roofer can now begin
- Examine whether the diagram passes the roof in
question.
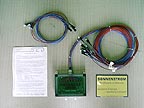
- Check the condition of the supplied SRT - sets
- The original roof tiles and snow stoppers are now
removed and stored for possible later re-use, or
disposal.
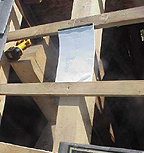
- The center cable inlet where the cables enter the
roof to the SSB is now made, this should be
approximately a 25mm hole.
- The SSB is then securely mounted just below the entry hole.
The wiring harness of the solar switch box can now be
fed through this hole from the inside out.
- Thread the individual numbered string cable pair
(consists of 2 cables, red + blue -) from the SSB one
after the other and distribute them immediately to the
planned string positions and secure them with
insulating tape.
- Always lay all cables under or beside the roof
frame, this can help prevent damage or a deformation of
the cable insulation.
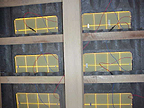
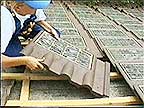
- When all string cables are in position and secure
you may start laying the roof tiles. Begin with the
first string, connect the 12 SRT together and the
string cables according to the diagram below. Fix the
SRT in place using screws or nails.
- Note: Each string produces a harmless safety
voltage so long as the SSB remains sealed and is not
connected to the inverter.
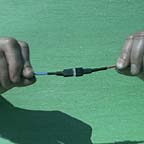
- The connectors used in this system have a simple
closing and opening mechanism.
- Closing-
take the two cables by the housing and
push together until you hear a definite "click". Check
they are firmly connected by gently pulling on both
cables.
- Re-opening-
to open the connected cables it is
important that you take hold and pinch the housing on
the inner (white) connector, and the cable (not the
housing) of the opposite connector. Pull them firmly
apart.
Note: make sure the installation is fully disconnected from the inverter and the grid before re-opening.
- Test the string immediately. If the string is
properly connected the corresponding red indication
lamp in the SSB will light up.
- Repeat this process for all remaining strings.
- When all red lamps are lit and all SRT are fixed,
you can be certain the installation is properly
installed and working.
- Snow stoppers, when used, can now be
reinstalled.
- Finished! - lightning protection
or extra metalworking is not necessary with this type
of installation.
What's Next?
The electrical installation may take place at any time
of your choosing. The coordination between the roofer
and the electrician is no longer necessary, as is the
case with a conventional panel installation.
Maintaining your SRT installation
You should make regular checks on your SRT system. They
include:
- Check your SSB and make sure all lamps are
on.
- Make sure your roof is free from dirt and
debris.
Should the dirt build up reduce the units efficiency,
you may clean the SRT units. Take care, do not
use chemical detergents or pressure cleaners.
We recommend soapy water with soft cleaning utensils,
to prevent damage to the sealing compound.
Important! Be sure your roofer leaves
a copy of the installation plan with you, it is an
integral part of your installation.
Safety information
- Only the licensed roofer is allowed to perform the installation.
He knows the dangers involved working on the roof and will take all the necessary precautions.
- Climbing on the roof is dangerous for the unqualified and may result in serious injury or death.
- The roofer is allowed to connect the SRT's and the SSB.
So long the SSB remains sealed and not connected to the inverter,
the voltage produced is a low harmless safety voltage.
- Only the licensed electrician is allowed to open the SSB.
When the SSB is connected to the inverter, the voltage produced can be dangerous.
Don't forget
Mount your supplied plaque on an external wall,
informing the public of your proud contribution towards
a clean environment.